Replacing auditorium seats starts with understanding what is already in your room. Whether you manage a school auditorium, church, theater, or performing arts center, clear measurements and photographs help a seating supplier evaluate your project.
Measuring only the seat cushion is not enough. The spacing between chairs, distance between rows, mounting system, and room layout all affect replacement options.
This guide explains what information to collect before requesting a quote. These preliminary measurements help start the conversation; final dimensions and installation requirements should be verified before seats are ordered.
1. Identify What You Want to Replace
First, decide whether your project involves complete chairs or individual components.
Are you replacing damaged seat cushions, worn backs, broken armrests, or entire rows? Are you hoping to keep the existing metal supports? Perhaps you want all new school auditorium seats while preserving the current seating arrangement.
Write down your goals and approximate quantity. Describe problems such as loose chairs, noisy folding mechanisms, uncomfortable cushions, or unavailable replacement parts.
Photograph any manufacturer labels, model numbers, or identifying marks. Older invoices and seating drawings may also help identify the original product.
2. Measure the Chair Width Correctly
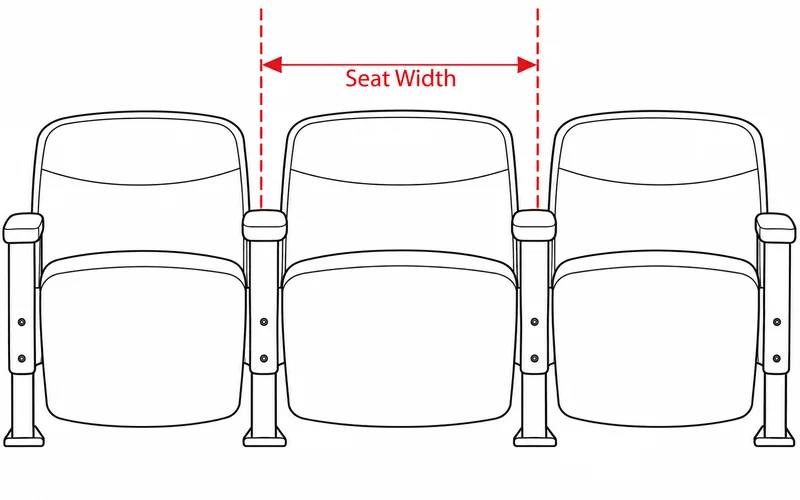
In fixed auditorium seating, chair size is commonly measured from the center of one armrest to the center of the other armrest on the same chair. This is different from cushion width or the clear opening between the arms.
Place a tape measure across the chair and record this center-to-center distance. Take a photograph showing exactly where the measurement begins and ends.
Measure several chairs in different rows. Do not assume every seat is identical.
Record cushion width separately if you need replacement cushions. Label each measurement clearly so your supplier knows whether it describes the chair spacing, cushion, or opening between armrests.
3. Record the Distance Between Rows
Row spacing affects the room available for replacement auditorium chairs.
For an initial survey, measure horizontally between matching points on the backs of chairs in consecutive rows. Record which points you used and include a side-view photograph. Your supplier can confirm the measurement method needed for the proposed seating model.
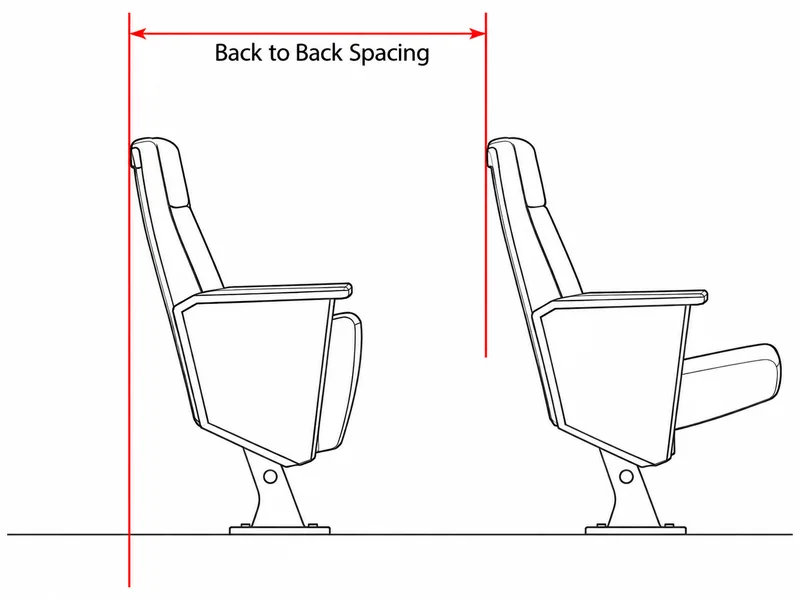
Also photograph the walking space between rows with seats folded up. Row spacing and clear passage are different measurements: a chair’s depth and folded position affect how much space remains for people to pass.
Check several locations, especially where rows curve or spacing appears tighter. Avoid estimating the entire room from one measurement.
4. Document How the Seats Are Mounted
Look beneath the chairs to see how the supports attach.
Floor-mounted seating attaches to the surface beneath the chairs. Riser-mounted seating attaches to the vertical face of a step or tier. Photograph the mounting arrangement from the side and near the attachment points.
If visible and safely accessible, record the mounting plate dimensions and distances between the centers of the anchor bolts. Note whether the floor appears to be concrete, wood, or another material.
Do not remove anchors or loosen supports to take measurements.
Existing holes do not automatically suit new seating. Have the supplier and installer verify mounting compatibility before planning to reuse them.
5. Note Floor Slopes, Steps, and Curved Rows
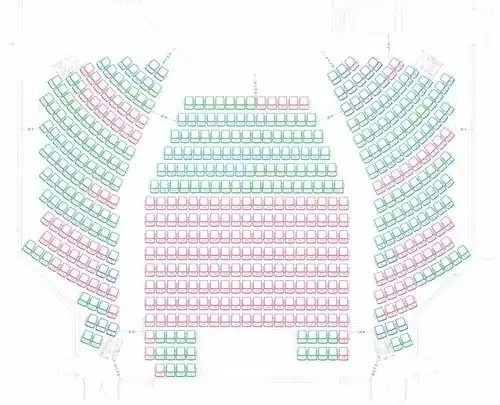
An auditorium may contain several seating conditions within the same room.
Describe whether the floor is flat, sloped, stepped, or a combination. For stepped seating, record the horizontal depth of the platform and the vertical height of the step where accessible.
Photograph curved rows from above or from the rear of the room. Curved arrangements require particular attention because chair placement can affect spacing near the ends of rows. Different seating models also have different limitations for curved layouts. See seating layout article for ideas.
Mark unusual areas on a simple sketch. A balcony, short front row, or narrow corner may require a different solution from the main seating section.
6. Measure Components When Keeping Existing Supports
If you hope to retain the metal framework, collect detailed information about the parts being replaced.
Measure seat cushions across their widest point and from front to back. Measure backrest width and height. Photograph attachment brackets, hinges, and the underside of the seat without dismantling the chair.
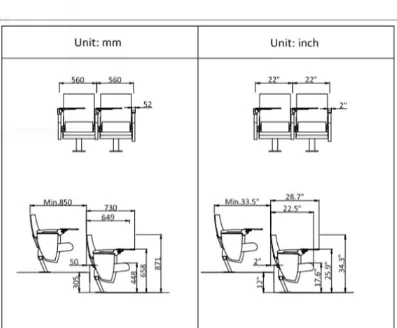
Include close-up pictures of damage and an undamaged example for comparison.
Matching dimensions alone do not establish compatibility. Attachment details, folding mechanisms, and the condition of the supports must also be evaluated.
Ask your auditorium seating supplier whether compatible components are available before committing to partial replacement.
7. Count Seats and Map the Room
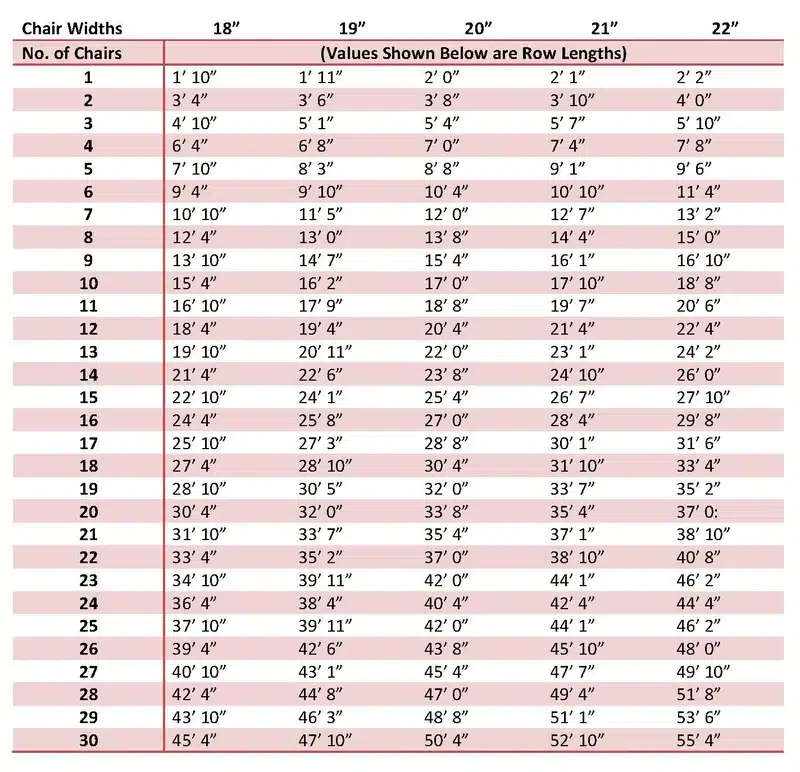
Create a simple inventory organized by section and row.
Record the number of chairs in each row, then identify missing seats, damaged chairs, and different chair styles. Mark entrances, aisles, columns, railings, and other fixed features.
Include existing wheelchair spaces and companion seating locations. Explain whether you want to retain the current capacity or consider a different arrangement.
Your sketch does not need to be professionally drawn. Clear labels are more useful than a polished drawing with missing information.
If you have original plans, send them alongside current photographs and note any changes made since installation.
8. Take Photographs That Answer Questions
A useful photo package includes a full-room view, a complete row, and front, rear, and side views of a typical chair.
Add close-ups of the mounting points, manufacturer labels, and any components you want to replace.
When photographing a measurement, keep the tape markings readable and show both endpoints. Name images by location, such as “Section A, Row 3, Seat Width.”
Photograph exceptions separately. A different chair in the balcony or a unique aisle-end support can be easy to overlook.
Good photographs help your supplier understand the measurements and identify questions before preparing a proposal.
Prepare Your Replacement Seating Request
Send your measurements, photographs, seat counts, and project goals together. Include the venue location, desired completion date, and whether removal or installation should be included in the quote.
Ask the supplier to identify anything still requiring field verification. Final seating plans should address mounting, circulation, accessibility, and applicable requirements before purchasing.
Ready to explore replacement auditorium seating? Contact Preferred Seating with your project information to discuss available options. A clear picture of your existing room is the starting point for choosing replacement seats that fit your venue and its needs.
Explore more articles in Theater Design & Seating.